

If you're here, you've tried to take your beautiful creation picture and somehow it doesn't quite right. Yes, you and me! I was there and still are. As I am not profession photographer, I tend to learn as I go. Every mistake I make it paid off the next photo shoot. So, how do we go from blahhhh to ahhhhh
What do you need :
1) Camera. Any camera would do with White balance and macro mode. Look up your camera and manual. Phone camera would work too. Smart phone takes amazing picture. For all my pictures, I took with Nikon D3100. It is my best business investment.

2) Lighting. : Spend sometime and do your own research and you will see. All roads lead to good lighting. Why? because when you have good lighting, it doesn't matter what background you use you will always has balance lighting pictures.
Many people will suggest to take picture under the natural sun light. Prime hours is between 10 am - 2 pm. Best location is next to the window with lot of light shining through. Just as shown in the picture below. You can follow the link to read this article at http://www.handmadeology.com
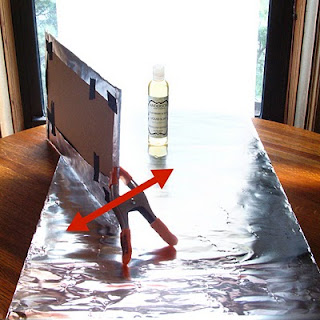
Unfortunate for me that my house is in the shade most of the day and being home with 2 small children. My working hour window is very slim. I chose to use light box.
3) Light box/ backdrop or background : I put these in the third because without lighting it doesn't do the job. You can make you own light box and you can find tutorial online. I used the commercial one because when I didn't know any better, I spend $$$ on any photography tools and kits as my budget allow. You choose your own background, white, color or texture (like wooden frame, slate, pretty paper)
Here is the key "SET UP YOUR PHOTO BOOTH" permanently. You may have all of the above now how to execute. For 4 years selling my handmade jewelry online, I was struggle with pictures. Last year, I take a look at my pictures and asked "What's wrong with my pictures?" I got everything I need to make them look nice but why the light is off and it was hassle to take one item pictures. Then I went back on researching and the light bulb went off.

I spare small corner of my tiny office for my photo booth. I put up my photo tent and set up my 2 lighting. Since then taking pictures is so much easier. Take less then 10 minutes. The raw image came out nearly perfect, lighting and temperature control. If I want to play around I just change the background.
My photo tent is 18" build with non reflection fabric. You can find them on ebay or amazon for about $30. They came with 5 colors backdrop but I only use white. With this set, there is 2 lights included but they are not enough. So those 2 lights in the picture are 45W CFL 6500K temperature, day light tone. I also got the lights on ebay for about $30.
The tent is defusing the light from the lamps and the white background is bouncing the light back made your picture has soft and balance lighting. Even the shadow look soft and please to the eyes. Since you have you light setup right, change the background will be super easy.
 |
| Unedited picture on wood background |
 |
| Unedited picture on white background |
4) Photo editing program : At many many resources, they stop the guideline at step number 3. Well just like us, we are not wake up looking pretty. We need to clean up and make ourselves look pretty, so does picture. You need to editing your pictures.
I use Photoshop to edit all my pictures. There are many other free applications such as picMonkey to do the job. You may feel intimidate at first but you will get a hang of it. All I do is adjust the RGB Levels then Vibrance if needed.
 |
| Unedited picture |
 |
| Adjusted RGB Levels |
 |
| Adjusted Vibrance |
 |
| Before |
 |
| After |
There is another reason I chose to do white background. It's much easier to edit :) and useful for many things afterward. Lately, I tried to make myself a wholesale Line sheet and some catalogs. It takes me few hours to make a mini catalog. I am very happy with the result. The print out look amazing I pad myself in the back LOL.

Hope you enjoy reading this and experience some for yourself. Photography is so much fun !


Sounds good. To me, the most important thing is to show the shopper the details so they aren’t left wondering what the side or back of the product looks like or what type of clasp it has.
ReplyDeleteBest Regards,
Clipping Path Services
Clipping Path
That's true. This article posted on 2016. Time and technology has changed and video clip is capture more attention this day. Thank for your input :)
DeletePhotography for jewelry seems usual like other products you see in online marketplaces. But, it is quite difficult to take photos of jewelry for showcasing, marketing, or promotional purposes.
ReplyDeleteBest Regards,
clipping path services
technology is changed nowday but its till now important to edit your product photos gently thats customers can see the real product with edit photos.
ReplyDeleteThanks for your blog.
Clipping Path
This comment has been removed by a blog administrator.
ReplyDeleteYou make all photos amazing.
ReplyDeletePortrait Retouching
I really enjoyed the post you wrote on how to take product photography for jewelry. I think that this is a topic that is important to everyone. It's not always easy to take product photos and your post made it so much easier! Hair Masking Service
ReplyDeleteInstruction and tutorial presented here is just live and awesome to learn
ReplyDeletethe jewelry editing. Appreciation.
Towards getting Excellent high quality jewelry Image
Check Some of our Jewelry Product editing service
Adept Clipping Path is a photo retouching company in united states. ACP specializes in photo editing and jewelry photo retouch. we provide high quality jewelry photo editing service at affordable prices. we have a expert team of over 70+ photo editors who can handle the quantity and quality.
ReplyDeleteThanks for sharing these tips on product photography! I love how you emphasized the importance of good lighting and a dedicated setup. Your experience really highlights that taking great photos is a learning process. I’ll definitely consider creating a permanent photo booth and using a lightbox for my own product shots. Excited to try out these techniques! (https://photofixal.com/ghost-mannequin/)
ReplyDeleteThank you for letting us into your world through this beautiful post. Your vulnerability and authenticity make your writing incredibly powerful.
ReplyDeleteVisit Here: Ghost Mannequin Service
The instructions and tutorial presented here are incredibly clear and engaging—perfect for anyone looking to learn jewelry photo editing. Truly appreciate the effort that went into creating this!
ReplyDeleteFor achieving high-quality, professional jewelry images, take a look at this trusted Clipping Path Service Provider.
Multiple Clipping Path Service
car image editing service
Great guide—jewelry photography is definitely one of the most challenging areas in product photography because of reflections, tiny details, and lighting control. The way you explained setup, angles, and background choice makes it much easier for beginners to understand how to get clean, professional results.
ReplyDeleteIn real projects, even after good shooting, a lot of improvement often comes from post-production work like removing dust, balancing reflections, and enhancing clarity without losing the natural look of the metal and stones.
For anyone looking to polish their final jewelry images for ecommerce or catalogs, this can help improve presentation quality: https://cutoutimageretouching.com/jewelry-photo-retouching/
Really helpful breakdown overall—especially for people starting out.